Managing the user in the system | LMS system
The shown below is the user form which you can fill in to create a user. The user created by this way are automatically marked as active. You can create either a user with student or teacher role.
The Course and the Course year are optional field they are added for future usages. Some admins like to have it to identity the user better , some have a requirement to build their custom module. So we have include it . For more details on this visit the Mng Academics section. Rest of the fields are self explanatory.

User can also register them self into the system but they will be inactivated till the admin don\'t admits them into the system by clicking on the thumb button. If you don\'t like user to register them-self you can disable the register feature from the setting page.

Enable registration button will allow/disallow user to register.
Ask for course detail will force/optional the course details to be filled while registration

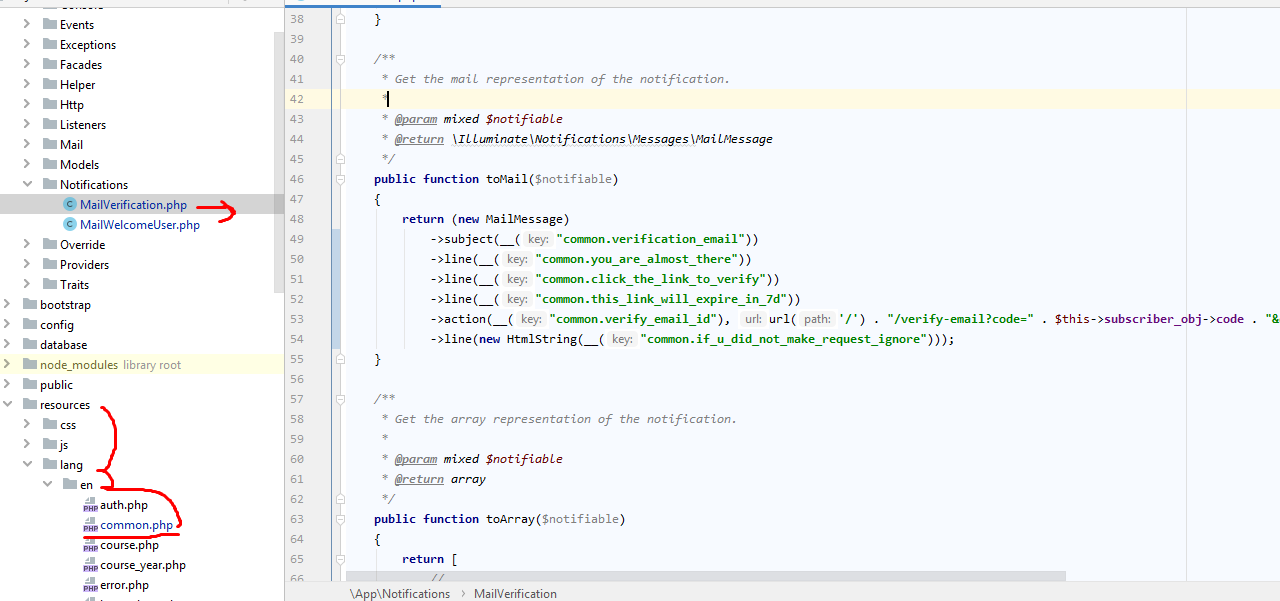
If you are developer these are the file that you should be looking to modifying the email content.
When you create/activate a user or when someone subscribes , A mail is trigger by the system. These are the 3 times when system fires a email.
If you like to change the text of the email then you can find the text details in the common.php file. if you like to add or remove some line then you can modify the MailVerification.php [For Subscription] or MailWelcomeUser.php [User Creation/Activation] .Note for any bulk action the email don\'t gets triggered.
If you are a non-technical guy.
You can change the text details from Lng translator section. For adding or changing the email template to suit your needs , u would be needing some technical skills, or you can contact us to know more.
How to import user?
For bulk importing user you can download the csv template by clicking on the download button next to the import user button Then paste in your user detail appropriately then select the file and Import users.


Course Id : Can be found in Mng Academics
CourseYear_Id : Also can be found at the same location Both are required field , if you don't want this feature you can create dummy course and course year and attached their ids here.
Type: It can be Student or Teacher . Case In-Sensitive
Active: 1 or 0 where 1 Mean an active account
Password: If not supplied will be assumed as 12345678
Username: It is nothing but the user email id
Phone: It is an optional field as well
How can you upload picture in bulk mode? (3 mode fallback searching)
The system looks for jpg file of the user in public/upload folder. In following format
1) if the user uploads the files (manually) then the system gives priority to it.
[This happens if u upload the file manually from the user management page].
2) if user image is not found which would be the case if you are uploading the users for the first time via csv
then it looks for the {id}.jpg . Say after you import the csv file all the user and their respective id gets created
you can see a id next to the user like below you have to rename all the user image to __.jpg as per the id created by system.
then upload all the jpg files to the pulic/upload folder.That is it.All the images get auto linked.
In the below example you would rename the image of Rosy if you have to 370.jpg and upload it to the public/uploads folder using either
your cpanel or ftp

3) Some users create random email id or already has email id for users since its required for the login ,Here the system will
look for image having the first part of the email say if the email linked in the csv for any user
was [email protected] then the system looks for jpg with abcd9876.jpg in the folder public/uploads and links it to that particular user.
4)If even after this it doesn't find an image then it looks for {phone}.jpg
If its unable to find the image via any of the above methods the default image will be show.
Username: It is nothing but the user email id
Required Field: NAME , USERNAME, COURSE_YEAR_ID , Course_ID
Note : KEEP THE HEADER Column and Don't tamper with it.
Now lets look at the User Listing Table. Most of the field are self explanatory.
The thumb icon that you see below is use to activate/deactivates the user. By default the user with student roles are selected in the filter section. All the inactive user will not be shown until you select the filter Filter By Role -> show inactivated users.
The bulk action [check-boxes ] are for 2 purpose : 1) Delete user in bulk , 2) Toggle the user state. Eg: say if the user are activated like the below image [green thumb] they will be deactivated and vice versa.
Note if you delete a user all the book that he previously borrowed from the system will also be deleted. So choose wisely.
How can you view & promote users of a class?
As you can see below when you click on promotions you will be taken to page where all the user of that particular class will be show.
All the users of the above clicked class is only show now you can select the users by clicking on the box show in the below picture then select the course and the appropriate year from the boxes and click on promote. Eg : Say in the below image the users listed are for BSc-3rd Year i would select Bsc from the course box and 4th year from the second box then choose all those user i want to promote then click on promote. For user those have left the system you can select those users and click on toggle user which basically will deactivate the user from the system. All those users which are unlinked can be found under Filter By Role -> Show non-activated user.
